What to know
- You can now set up and use your own voice using Personal Voice with Live Speech on iOS 17. Live Speech is an accessibility feature that helps read out phrases, words, and sentences you type.
- You can set up Personal Voice by going to Settings > Accessibility > Personal Voice > Create a Personal Voice.
- To use your Personal Voice, you can select it for Live Speech under Settings > Accessibility > Live Speech > Voice > Personal Voice.
- Once selected, press the Sleep/Wake button three times to activate Live Speech and type the required sentence. The typed sentence will now be spoken using your Personal Voice.
Apple has constantly strived to improve existing accessibility features and introduce new ones to help users around the world. Live Speech has been a great way for users with ALS and other physical health conditions or impairments to communicate with their friends and family using their devices.
It readily reads aloud anything you type, allowing people who have trouble communicating to have a voice. This feature is now being taken a step further, thanks to the release of Personal Voice. Personal Voice is a new accessibility feature that enables you to train and store your voice locally on your iPhone with the release of iOS 17. Let’s take a quick look at this new feature and how you can use it to your advantage.
What is Personal Voice in iOS 17?
Personal Voice is an accessibility feature introduced in iOS 17 that enables you to record and store your voice on your device for use with the Live Speech feature. This innovative feature utilizes machine learning to analyze 15 minutes of audio recorded in your own voice, creating a personalized voice profile. With this profile, you can have your device read out any text you type using Live Speech in supported applications.
Some individuals may face the risk of losing their voice over time due to certain medical conditions. Personal Voice provides a solution by allowing users with such conditions to store their unique voice on their device. This empowers them to effectively communicate with their friends and loved ones. Importantly, when using Personal Voice, all recorded data is stored and processed locally on the device, ensuring maximum privacy. This convenient and secure approach allows you to utilize your own voice with Live Speech seamlessly.
How to set up and use Personal Voice on your iPhone
Now that you’re familiar with Personal Voice, here’s how you can set it up and use it on your iPhone running iOS 17. You will need iOS 17 or higher to use this feature. So if you haven’t updated your device, you can do so by going to Settings > General > Software Update. Once your device has been updated, you can follow the steps below to set up and use Personal Voice.
Note: You will need Live Speech enabled so you can use Personal Voice with it. If you haven’t enabled this feature, we will discuss how you can do so in Step 2 below.
Step 1: Set up Personal Voice
Here’s how you can set up Personal Voice on your device.
Open the Settings app.
Tap Accessibility.

Now scroll down and tap Personal Voice under SPEECH.

Next, tap Create a Personal Voice at the top.

Tap Continue at the bottom.

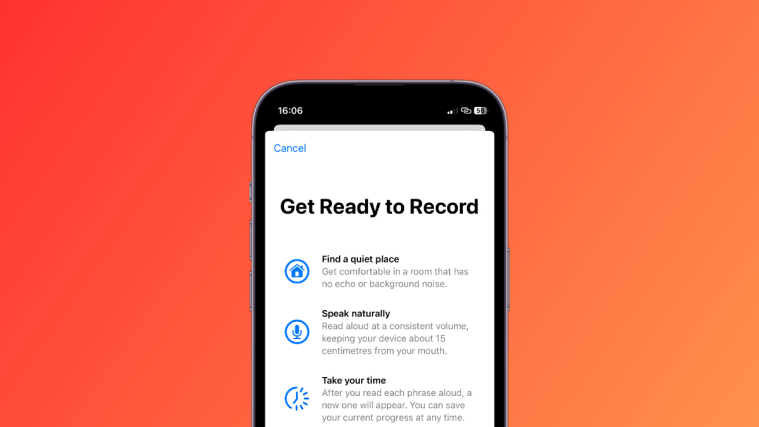
You will now be shown the basic instructions to record your audio. We recommend you go through these instructions and try to follow them as closely as possible.

Once you’re ready, tap Continue at the bottom.

Now add a preferred name for your Personal Voice at the top so you can easily identify it in the future.

Tap Continue once you’ve named your Personal Voice.

You will now be given your first phrase to check the sound quality. Ensure you’re in a relatively quiet environment and get ready to read the phrase. Once you’re ready, tap the Record icon and read the provided phrase.

The phrase will now be recorded and if any discrepancies are found that might affect the quality of your Personal Voice, they will then be shown to you. In such cases, you can tap Listen to view a preview of the recorded phrase.

Tap Check Again if you wish to record the phrase again.

Tap Continue if you’re ready to proceed.

You will now be shown the next phrase. Repeat the steps above to record this phrase as well.

If all goes well, the recording for the next phrase will be automatically initiated. Continue recording the on-screen prompts to complete the Personal Voice setup.

Apple requires you to record around 15 minutes of audio before your Personal Voice can be set up on your iPhone. The same will be tracked at the top of your screen and it will be reduced as you continue recording phrases.

Note: You can choose to tap Done and complete the remaining setup later on. Your device will remember your progress.
You can tap the Stop icon any time you wish to stop recording.
You can also tap Preview to hear an audio preview of the current phrase on your device.

Tap the Back icon to go back to the previously recorded phrase if needed.

Tip: We recommend you take your time when recording phrases and be aware of your diction. Changes in your tone, voice, pace, and more can all impact the final outcome. Thus recording as naturally as possible will help create a more realistic replication of your voice once everything has been set up. We also recommend you be expressive when reading out exclamations, questions, and more for better final results.
Once you’re finished, you will be greeted by the You’re Done Recording screen. Tap Continue at the bottom.

Your recordings will now be processed locally to create your Personal Voice and you will now be informed of the same. Plug in your phone to initiate the processing immediately which can take up to an hour. Tap Done once you’re ready.

You can track the processing progress in real time under PERSONAL VOICE at the top.

Turn on the toggle for Share Across Devices if you wish to use this Personal Voice with other Apple devices using the same Apple ID.

Tap and turn on the toggle for Allow Apps to Request to Use if you wish to allow third-party apps the ability to request access to your personal voice. This can come in handy if you use other third-party accessibility apps on your iPhone.

And that’s it! Once your Personal Voice is created you will receive a notification for the same. You can then use the next step below to use your Personal Voice on your device.
Step 2: Use Personal Voice with Live Speech
Now that you’ve set up your Personal Voice, use the steps below to enable and use the same with Live Speech on your device. If you already have Live Speech enabled, you can skip the first few steps. Let’s get started.
Open the Settings app and tap on Accessibility.
Now scroll down and tap Live Speech under SPEECH.

Tap and enable the toggle for Live Speech at the top.

Tap Favorite Phrases to add any preferred phrases that you use frequently.

Next, tap the currently assigned voice under VOICES.

Tap Personal Voice at the top.

Now tap and select the Personal Voice you generated in the steps above.

You can now press the Sleep/Wake button three times to activate Live Speech. Now type any phrase and it will be spoken in your voice.

And that’s how you can set up and use your Personal Voice with Live Speech on iOS 17 and above.
We hope this post helped you easily set up and use your Personal Voice on your iPhone. If you face any issues or have any more questions, feel free to reach out to us using the comments section below.


nice
I set up Personal Voice on iOS 17 very useful.
I like it
nice
I can see personal voice, I’ve just got a list of different accents